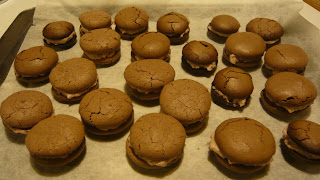
So a friend's birthday recently went by and I promised them that I would make Green Tea Macarons for them.
I'm happier with the outcome - except for the first batch which I overbaked a bit. However, I think I am gettting used to the different oven temperatures and knowing when to rescue a potential overcooking! Oh and I almost forgot to mention that I left the green tea powder at home so the filling is less green tea like than I would have wanted.
And apologies for not updating my blog, the last thing I made was a card but I forgot to take a photo of it.
I'll be happy when all this planning stuff is over and I actually get some time back to do crafty things again!
Tuesday, 15 November 2011
Monday, 8 August 2011
Macarons Take Two
Been a while since I have blogged!
My latest baking adventure has been a return to making macarons. I went a bit crazy buying almond meal a few months back and now that they will expire in a few months I thought I'd better get cracking on using it up.
So this time round its Chocolate biscuit and raspberry filling for the macarons.
I modified the vanilla recipe by adding cocoa powder, but did not realise untill later that there was a specific modification to the other quantities. Whoops!
Anyhow, here are the batches:
Batch 1 and 2 = Fail, cos overcooked/burnt/cracked
Batch 3 = Perfect after I worked out how to avoid the cracking
Batch 4 = Cracked but still good
The crappy 1st and 2nd and 4th batches - uneven sizes and cracked, burnt
Ah sweet success - I have finally worked out how to pipe properly! Check out the smooth tops!
Next time round - Raspberry Biscuit and Vanilla filling. I have also said to my friend I'll make Green Tea Macarons for them for their birthday.
Sunday, 27 March 2011
Bracelet
Stuck at home with a groggy head.
In order to feel like I have achieved something this weekend, I pulled out my stash of jewellery making bits.
Here's what I produced.
Lessons learned: using elastic for bracelets.
In order to feel like I have achieved something this weekend, I pulled out my stash of jewellery making bits.
Here's what I produced.
Trickiest bit is tying the ends tight enough so that it doesn't break!
Lessons learned: using elastic for bracelets.
Wednesday, 26 January 2011
Too Young to Care!
Was my nieces birthday a few weeks back and I was told to come dressed as a pink butterfly.
Well I did do that but I cheated and bought butterfly wings. The part that I did decide to create was a birthday card, something I thought my niece would appreciate....
Making the card was quite a lot of fun, deciding upon the colours was tough!
Here's what it looked like.
Upon giving it to my niece, she glanced at it for 10 seconds and was then consumed by the butterfly wings, gettting me to put them on for her and then heading off to galavant around the house and show off.
Sigh next time I must remember...don't make cards for young kids!
Sunday, 2 January 2011
Stool gone Vintage
After procrastination to finish this stool revamp, it has finally been completed!
The most complicated part of this project was the thought behind the construction and the sourcing of the padding used for the chair. Other than that it was actually quite easy to do, although I think some of us would cringe at the amount of hand sewing I did. My initial staple gun idea didnt work so I had to revert to the sturdier sewing.
And now that I have a sander (thanks to a lovely xmas present) I am set to reduce the pain I went through to sand the chair!
Stool Before Image (Note: the stool had been sanded and varnished already as I forgot to take a before photo!)
Stool After: Fabric chosen to match current vintage obsession of mine
Subscribe to:
Comments (Atom)


